If you want to start a blog or a website using WordPress, you need to install WordPress on your webspace. Many web hosting providers offer automatic installations, but they often come with plugins and fluff that make your website slower. Hence, if you want a fast WordPress website, you should install WordPress manually.
Even if you’re new to WordPress and you’ve never built a website before, don’t worry. In this post I’ll walk you through 7 practical steps to install WordPress manually, step-by-step.
You’ll learn how to:
- Install WordPress manually
- Create a MySQL database
- Transfer your WordPress files to your webspace using FTP
Keep reading!
Here are a few related posts you might want to read:
- How to Setup WordPress After Installation: Beginner’s Guide
- 4 Essential Tools You MUST Learn to Become a Web Developer
Please note: This post contains affiliate links to products I use and recommend. I may receive a small commission if you purchase through one of my links, at no additional cost to you. Thank you for your support!
Why Should You Use WordPress for Building Websites?
WordPress is a true all-in-one website tool – and for a good reason. You can use WordPress to create any kind of website these days. If you plan to become a freelance Web Developer, for example, you can build full-scale websites for your clients much faster with WordPress.
And here’s the good news:
You’ll never feel left alone with your questions about WordPress. It’s the most popular Content Management System (CMS) worldwide, so you’ll always find help and support in the huge global community.
If you’re new to WordPress, check out my article on the essential reasons why WordPress is the best tool for fast and easy website development.
However, even though WordPress claims to be quick and easy to install (the famous 5-minute installation), a manual installation can take a bit longer.
That being said, you should pay attention to a few key points when you install WordPress manually. This will help you setup everything properly to avoid any technical issues in the long run.
Recommended: How to Use the Yoast SEO Plugin For WordPress SEO: Beginner’s Guide
7 Easy Steps to Install WordPress Manually:
To help you make sure your WordPress website will run smoothly, we’ll go through the following steps in this post:
- Downloading WordPress.org
- Accessing your cPanel
- Creating a database in your web host’s cPanel
- Setting up your wpconfig.php file
- Using an FTP client
- Transferring the WordPress installation files to your webspace
- Installing WordPress manually
To install WordPress manually, you need to register a domain name and sigh up for web hosting.
You can find dozens of good providers and choose freely, of course. If you want a reliable, beginner-friendly solution, go with Bluehost like I did. I’ve even teamed up with them so that you have access to an exclusive deal for my readers starting at just $2.95 per month – including a free domain name.
(Yep, that’s an affiliate link, because I know you’ll like Bluehost just as much as I do.)
Step #1: How to download the WordPress.org software
To get started, let’s head over to wordpress.org/download and download the latest version of WordPress.
You will find the blue button for downloading the ZIP archive on the right side of the page:
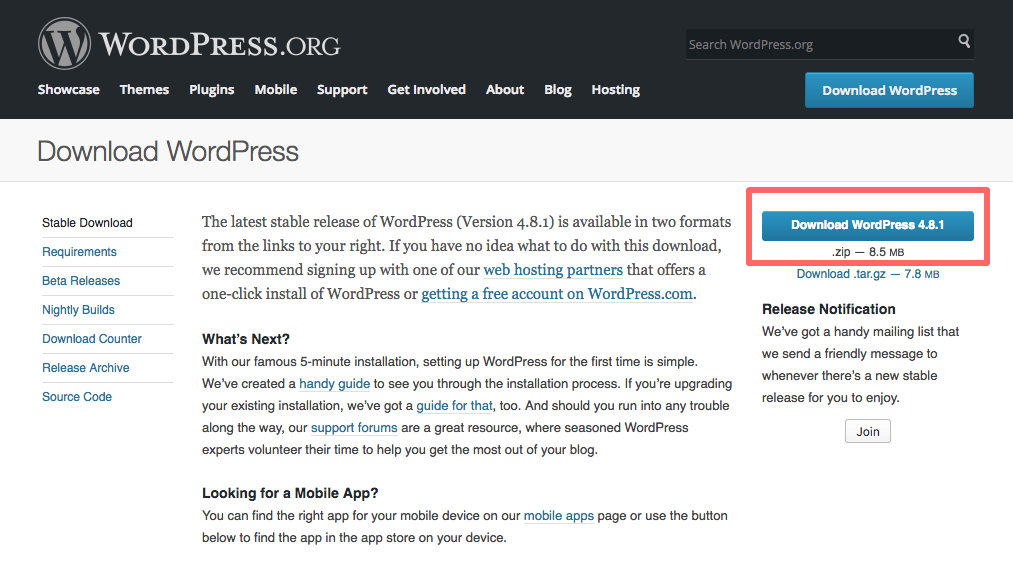
Now, click on the button to download the file. The ZIP archive contains all WordPress core files, which you can use to create a new WordPress website.
Create a new folder for the WordPress core files and unzip the files into the new folder. Here’s what is inside the ZIP archive:
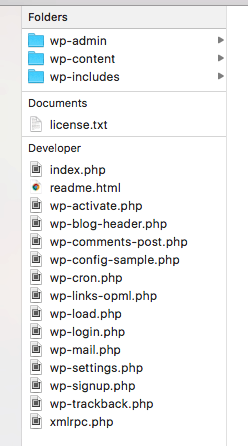
As you see, the entire software consists of three folders and a bunch of different files inside the root folder.
Step #2: Log in to your Control Panel
Before you can install WordPress on your web space, you will need access to your web host’s Control Panel (or cPanel). You will use it to create a database that is necessary for WordPress.
Log into your cPanel with your web hosting provider. You will get your login details when you sign up for a web hosting plan with them. For example, if you choose Bluehost like I did, you will receive an email with your login details right after you complete your signup process.
If you’re looking for a beginner-friendly guide, check out my step-by-step tutorial on how to start your first WordPress website with Bluehost.
Step #3: How to create a database for WordPress
To create a database, find the section for managing databases in your hosting provider’s cPanel.
The tool for managing databases is usually called phpMyAdmin.
Nevertheless, your web hosting provider could also have a separate, simple tool for creating a database called something like “MySQL Database Wizard” or similar.
If you are not quite sure which tool to use, check the Q&A of your service provider or contact them directly.
Here’s what it looks like in my CP:
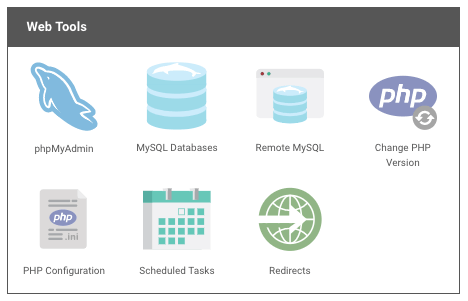
In this case, I would go to MySQL Databases. After that, on the page that opens, I have the possibility to create a new MySQL database:
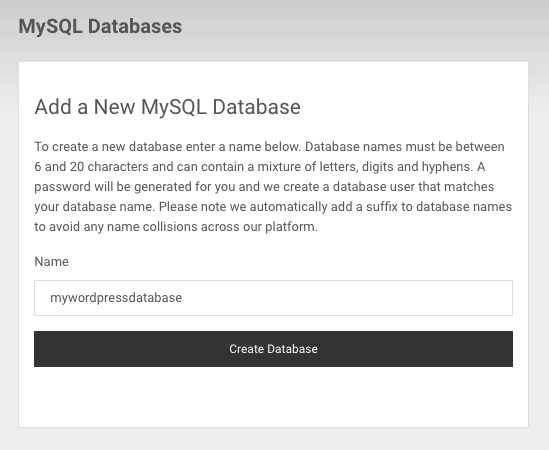
Simply type in a descriptive name for your database, like “mywordpressdatabase“, for instance.
Go ahead and create a new database for yourself. Additionally, determine a username and password for your database.
Finally, allow all privileges for your username. That way, you will be able to create, modify, and update tables in the database.
For now, the database does not have any tables in it. But no need to worry, WordPress will populate the tables automatically during the installation.
Related post: How to Backup Your WordPress Website Using a Plugin – Step-by-Step Tutorial
Step #4: How to create a wp-config.php file
Next, your will need to link the database you just created in the previous step to the new WordPress installation. In the meanwhile, your web host will set up and configure your database – it can take a few minutes.
First, find the WordPress ZIP file you just downloaded and unzipped.
Now, find a file called wp-config-sample.php. This file contains the base configuration for your manual WordPress installation, including the settings for your new MySQL database.
The file is in the root folder of the unzipped set of files and folders:
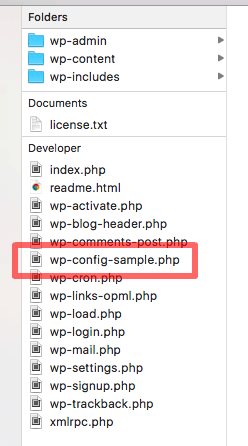
Rename the wp-config-sample.php file to just wp-config.php.
Open the wp-config.php file using your text editor, like Atom, Brackets, Sublime Text, or Notepad++, for instance.
If you don’t have a code editor yet, check out these best text editors for coding and web development.
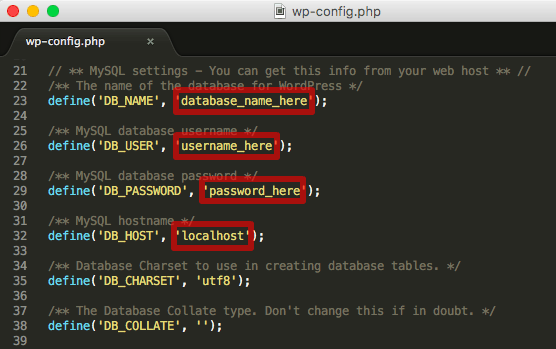
Next, you will need to edit the following entries for your MySQL database in the file:
- Database name
- Username
- Password
- Hostname
You will find all of these in your database overview in your web host’s Control Panel. Here’s a screenshot of the spots you need to update in your text editor:
Step #5: Create an FTP connection for file transfer
Now you will need to actually upload the files to your web host’s server.
To do this, you will need an FTP client, such as Filezilla. There are several good clients you can choose, of course. Filezilla is just what I’ve used for ages already.
If you are using Filezilla, simply enter your host address, e.g. ftp.example.com, your FTP username, your FTP password, and the port at the top of the window:

The port number is usually 21 for regular FTP and 22 for SFTP. To connect to the server, click Quickconnect.
Step #6: How to transfer WordPress installation files using FTP
Once you have you FTP connection up and running, it is time to transfer the WordPress installation files to your web host’s server.
Within your FTP client, e.g. Filezilla or FireFTP, the screen has two columns, left and right:
- The left side shows the files on your computer
- The right side shows the files and folders on your web host’s server
Start by locating the WordPress installation files on your computer in the left column.
Navigate to the folder where you have your wp-config.php file and all other files that were in the ZIP archive you downloaded initially from wordpress.org.
Next, on the right hand side of your FTP client, find the folder on your web space that you wish to use for your WordPress installation.
Quite often there is a folder called public_html or www. This is the root folder you want to transfer your WordPress installation files into. If you are not sure which folder to use, contact your hosting provider directly.
Then, on the left hand side of your FTP client, select all files within the wordpress folder.
To proceed, right click the files and select Upload or use a button called Upload in the navigation bar of your FTP client:
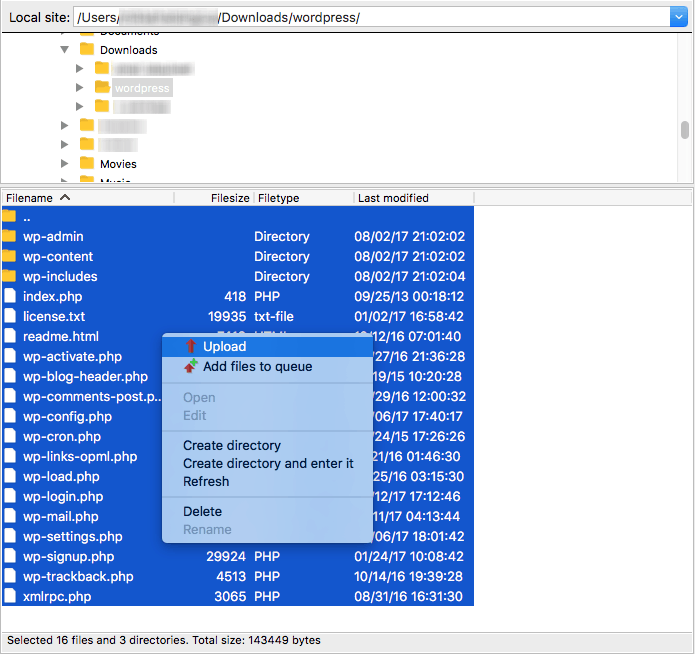
It takes a little while for the files to transfer. After it’s done, you can move on to the actual installation stage:
Step #7: Finish the installation: Install WordPress Manually
Almost done! Just one more final step to install WordPress manually:
Type the URL of your soon-to-be website in your web browser, i.e. the domain name you registered for your WordPress website.
First, you will see the first page of the installation process, where you need to choose the language for your WordPress installation:
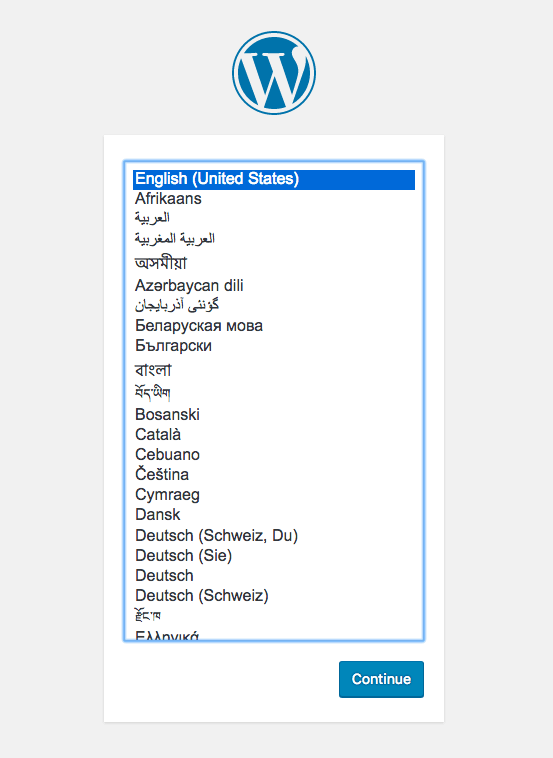
Just click Continue to proceed.
On the next page, you need to fill out a few fields for the website title, your username, password, and email address:
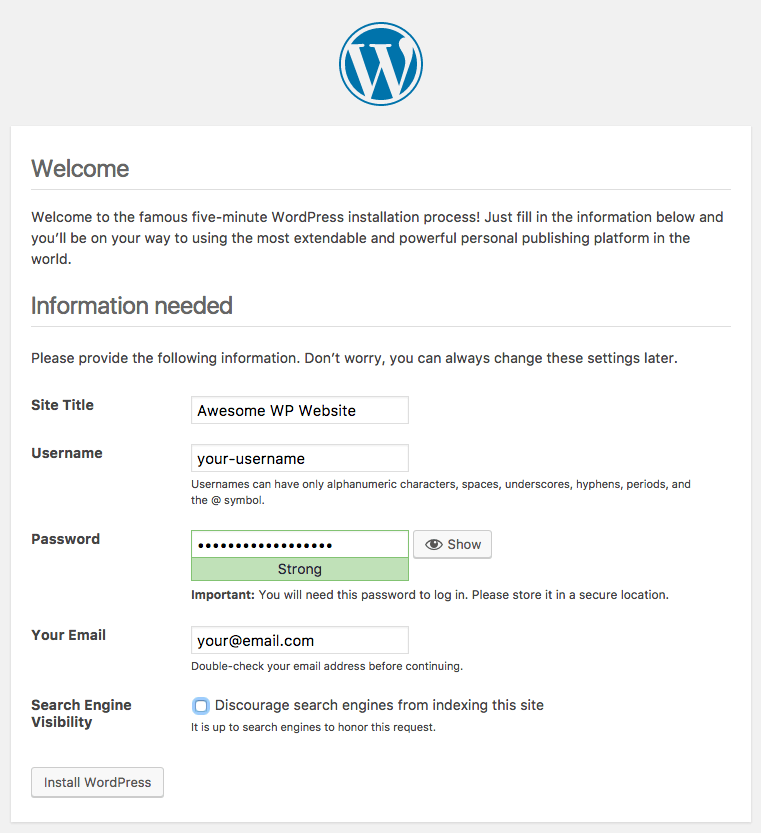
Additionally, you may choose to discourage search engines from indexing your new website. I’d recommend checking the box if you’re just getting started with developing your new WordPress website.
You can uncheck the box anytime later in your WordPress admin area once your website is ready for the public.
Finally, just hit the Install WordPress button.
Good news: you are done!
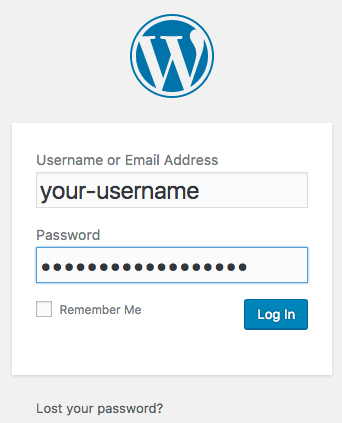
You can now login to your WordPress admin dashboard by using the login credentials you created during the installation process:
And there you have it: a beautiful, fresh WordPress admin area dashboard!
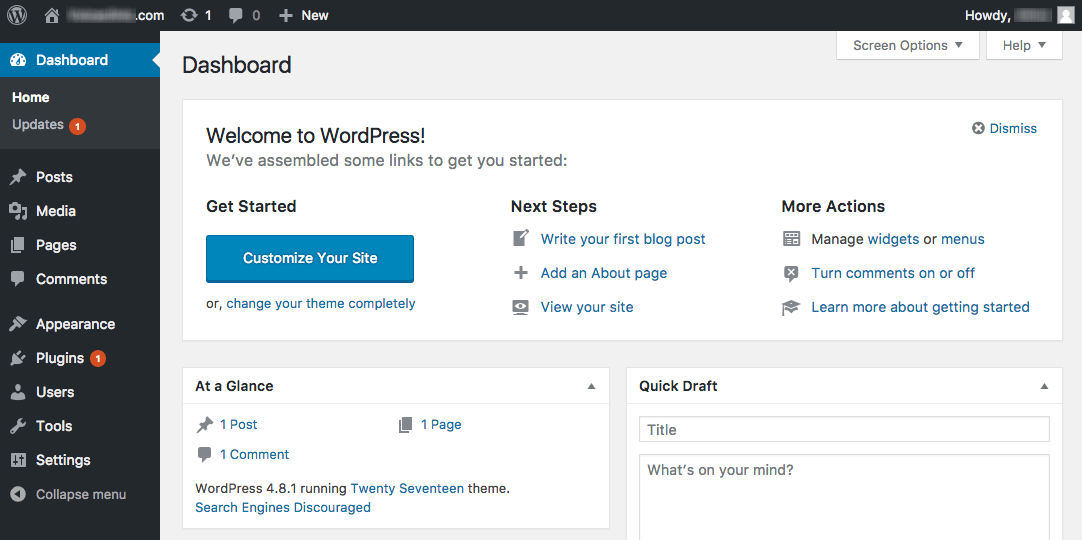
That’s it, you’re all set!
Final thoughts: How to Install WordPress Manually – Step-by-Step Beginner’s Tutorial
Even if you’ve never used WordPress before, it’s quite easy to install WordPress manually. Although it might sound technical and difficult, just pay attention to the steps we went through above.
Once you’re done with the manual WordPress installation, you’re ready to start using WordPress to create pages and posts, adjust the design using a suitable WordPress theme (opens in a new window), and much more.
But before you do, make sure you go through these 10 essential steps to setup your WordPress website properly after installation. They’ll make it easier for you to learn and use WordPress – and also boost your website speed and SEO rankings.
And if you’re starting a blog with WordPress, check out my helpful beginner guides at Blogging Explorer. I’m sharing everything I’ve learned about how to:
- Start a blog from scratch
- Create awesome content for your readers
- Grow your blog traffic
- Make money blogging
I’ll see you there!
Here are a few helpful posts you might want to read, too:
- Why Start Learning Web Development and Coding? 12 Essential Benefits to Think About
- The Best Web Development Courses For Beginners
- 4 Fundamental Steps to Get You Started With Coding
If you enjoyed this post on how to install WordPress manually, just drop me a line in the comments below!
P.S. If you liked this article, make sure you share it with others so that they can find it, too! Thanks for your support!
I’ll see you in the next post! Happy coding!
– Mikke


What is the advantage of installing word press manually over using it through your web hosting site in the browser?