Backups aren’t sexy. Backups aren’t fun. Yet, if you don’t have a solid and easy way for creating a WordPress backup of your website regularly, you could be paying an unnecessarily high price once something goes wrong.
In this post I’ll show you an easy and fast way of backing up your WordPress website.
When you have a WordPress backup saved on your computer or in the cloud, it’s easy to restore your data and your entire website.
To show you how it’s done, let’s get started!
Related post: 9 Great Reasons to Use WordPress for Building Websites
Why create WordPress backups in the first place?
I know, I know, you’ve heard this like at least a thousand times… ALWAYS have a backup at hand!
Imagine this: you’re running a website with a great blog, nice portfolio and quite a few followers. Then one day your site is down, you can’t access the admin area and everything’s just awfully wrong.
How are you going to recover all the work you’ve put into creating everything you had?
Backups don’t really cost you that much time or effort, but they can save you a lot of time and effort in the future.
Of course, not everyone knows their way around the different WordPress backup tools or restoring backups to begin with. If that’s the case with you, keep on reading!
How to create a WordPress backup?
To create a backup of your WordPress website, there are two ways to do it:
- Use a plugin
- Create a backup manually
Both of these have their own pros and cons. But since this post is about easy backups, I’d recommend using a plugin.
In my opinion, a good backup plugin creates only one single file with everything in it. That includes your pages, posts, media, users, themes, plugins, and settings – all in one!
So whenever you need to restore a backup, you can turn back time with a single click.
After all, if it’s easy and quick, you’re more likely to keep doing it regularly.
Creating a WordPress backup with the All-in-One WP Migration plugin
To make things easier for you and me, there are a few good plugins you can use for creating your backups. They’ll take care of packaging your files and your database of your website. Especially if you’re new to backing up with WordPress, it might be a good idea to use a plugin.
Now some plugins offer good free versions, while some require a premium version to create a full backup.
There are several good plugins to choose from. I’ve been using one called All-in-One WP Migration from ServMask and it’s been working like a dream so far. I first stumbled across it while taking this WordPress course on Udemy and since it’s easy to use and reliable, I haven’t looked back.
I know it’s called WP Migration, but it can also be used for creating backups. And what’s more important: it’s free and easy to use!
However, if your WordPress website is very big, the free version of this plugin isn’t for you. It only allows for a maximum backup file size of 512 MB. But that’s probably enough for the most of us.
Here are a few of the other popular plugins in case you’re keen on having a look:
Please feel free to share your thoughts and your favourite backup method or plugin in the comments below!
Installing the All-in-One WP Migration plugin
You can simply install the plugin in your WordPress admin area under Plugins > Add New.
Search for the plugin by using the name of it and then click Install Now.
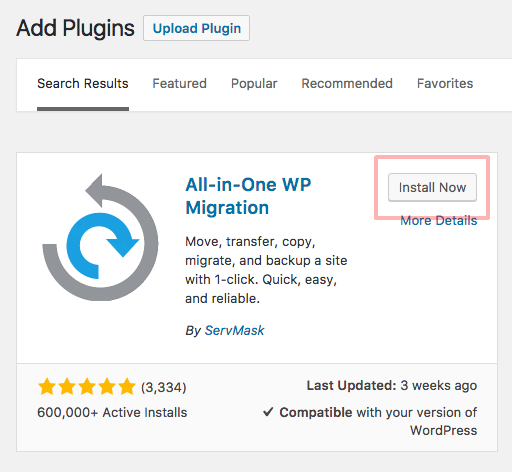
Once the installation is complete, click Activate.
The plugin now shows up in the left-side navigation bar in your WordPress admin area:
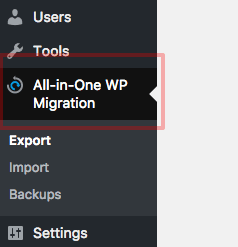
Creating a backup file
To create a backup of your WordPress website, simply navigate to Export.
The free version of the plugin allows exporting to a file, which is what I’ve been doing and it’s working nicely. The other options (FTP, Dropbox, Google Drive etc.) cost a bit extra.
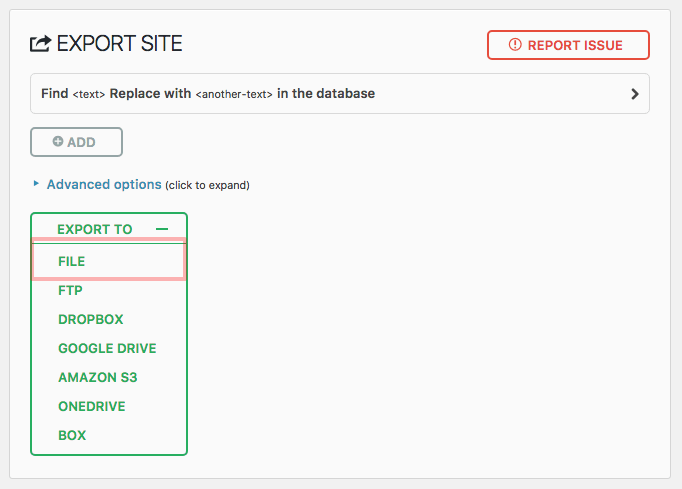
Once you click on export to File, the plugin will start archiving your files and database.
You can sit back and relax for a minute here, or go and get another cup of coffee.

Downloading your WordPress backup file
When the archiving is finished, you’ll see a green button for downloading your WordPress backup file:

Simply download it – and that’s it!
You now have a full WordPress backup file of your entire website on your computer. The file extension for the backups is .wpress.
You can also use the file for migrating from one domain to another one, or from staging to live environment.
But whatever you do, don’t store your backup files on your web host’s server! I usually keep one backup on my computer and one in the cloud so I can access it anywhere.
Reviewing your past backups
The plugin also has a section called Backups. This is where you can see all the backups you’ve done for your website that are stored on your host’s server.
You can easily restore a backup, delete them, or download them as files onto your computer with the three buttons on the right.

How to restore a WordPress backup with the plugin
Usually, you’ll use a backup for a fresh installation of WordPress. You know, when your website crashes or when you’re migrating to a new server, for instance.
If things didn’t go that bad, you might need a backup after some theme modifications, too. Then you can simply restore a backup in your existing WordPress installation.
Importing your WordPress backup from a file
Go ahead and login to your WordPress admin area and follow the steps above to install the All-in-One WP Migration plugin.
You should now find the plugin in the left-hand side navigation bar in your admin area. Go to Import and you’ll see this:
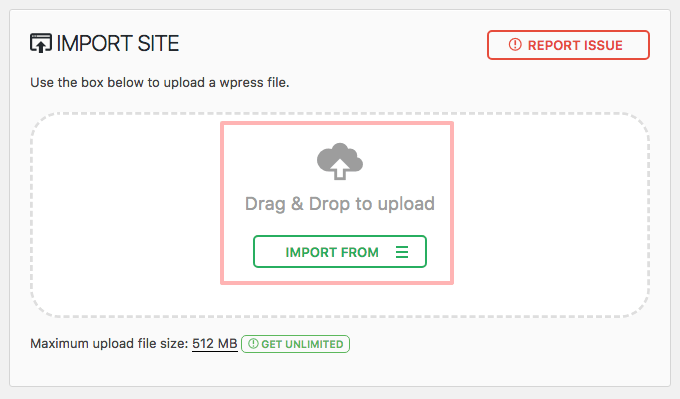
See how easy it is! The plugin lets you import directly from a .wpress backup file! Just drag and drop it to the highlighted area or browse for the file by clicking Import From > File.
You’ll see a progress bar and a warning saying that the backup restore will overwrite all existing data on your website:
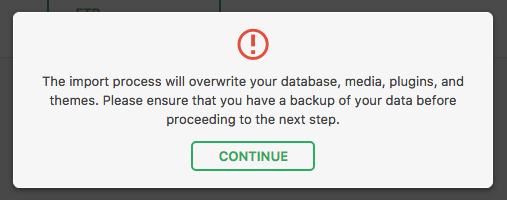
To finish the backup restore, you receive the following instructions:
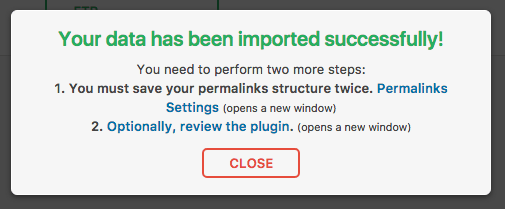
So here’s what to do:
- Login again with your old login credentials. Remember, you just restored a backup, including your old login details.
- Once logged in, navigate to Settings > Permalinks in your WordPress admin area and click Save Changes twice. Twice!
- Finally, have a look around your website and make sure everything is working as it should.
Alternative way: importing a backup file from server
Unfortunately, things don’t always go as smoothly as you’d expect with the plugin. For some reason, the import process can freeze sometimes.
Luckily, there’s another way of importing your WordPress backup using the plugin. You can upload your backup file to your web host’s server and import it from there.
For this, you’ll need FTP access to your webspace. You’ll get the login details directly from your web hoster.
Alternatively, you can use a File Manager in your web host’s Control Panel (CP). That would look something like this, depending on your hosting company’s CP user interface:
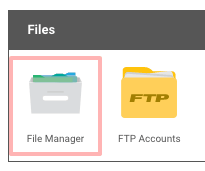
And here’s how it works:
- Access your WordPress installation folder using an FTP client or via your web host’s Control Panel (CP).
- There’s a separate folder for the plugin’s backups under wp-content > ai1wm-backups:
- Upload your backup file (file extension .wpress) to that folder like I’ve done in the picture above.
- Go to your WordPress admin area and navigate to All-in-One WP Migration > Backups.
- You should see the backup file you just uploaded listed in the available backups.
- Click Restore to start restoring the backup:
- As with the direct import via your WP admin area, you’ll have to login again once the backup is restored. Use your login credentials of the WordPress website that you just restored.
- Go to Settings > Permalinks and click Save Changes – twice! Twice!
- Finally, go ahead and check your website to see if everything’s working as it should.
Final thoughts: How to create a WordPress backup
I hope you’ve backed up your WordPress website by now! It’s really quite easy and quickly done with the right tools. It simply gives you such peace of mind knowing you always have a copy of your WordPress website at hand – just in case.
There are plenty of different ways of creating and managing your backups. This post is focused on the All-in-One WP Migration plugin, but you can have a look around and find the one that suits you best. I chose this particular one, since it’s free and super easy to use.
One thing to consider with premium plugins is that they come with additional perks, of course. They sometimes offer malware scanning and store your backups automatically on their cloud servers.
Whichever tool and way you choose, try and create a habit out of it. When you do it once, you’ll slowly start building a routine. After that, creating a backup whenever you’re updating or adjusting your website is like a walk in the park.
I hope you found this post helpful! Please share your favourite methods of creating a WordPress backup in the comments below!
Read next: Using Yoast SEO Plugin for WordPress SEO
Happy coding!
– Mikke

