What if I told you that you can build a portfolio site on WordPress in just a few hours? Or that launching my web developer portfolio helped me land my first freelance job in a matter of days?
Even if you’re new to web development, you can use WordPress to get your portfolio site up and running right now.
It saves you dozens of hours of work, allowing you to focus on stuff that really matters.
But what if you’re still learning to code? What if you don’t have full-scale, real-life projects to showcase yet?
Don’t worry! Start with just a few small but meaningful projects at this point.
You don’t need to be the best web developer in the world right now.
You simply need a site that helps you find your first jobs to make money with your tech skills.
To help you get started, I’ll show you 11 essential steps you can take right now to build a web developer portfolio site on WordPress and land your first job faster.
By the end of this post, you’ll know how to create a basic (but beautiful) WordPress portfolio site to impress potential clients and start building your online presence.
And hey, if you’ve never built a website before, don’t worry. We’ll start with the very basics like domain names, web hosts, and WordPress installations.
Without further ado, let’s dive right in!
Related articles for you:
- How to Build a Website From Scratch: Step-by-Step Guide for Beginners
- What Is The Best Programming Language for Freelancing?
- 4 Must-Have Skills to Become a Web Developer Step by Step

Why do you need a developer portfolio website?
If you want to become a successful web developer, potential employers and clients need to be able to find you online.
When they search for skilled developers in their area on Google, you want your portfolio site to be at the top of the search results.
Thus, an online portfolio is simply a unique way of showcasing your best work to the world.
You can use it to give employers and clients a better idea of who you are, what you do, and what types of problems you can solve for them.
The best part?
If you know the basics of how to make a portfolio website in WordPress, you can set yourself apart from the competition more easily.
And if you know the tricks of the trade, your site can eventually do all your marketing for you on autopilot. It’ll help you build trust with your visitors, making it much easier to find and land your first web dev job.
Please note: This post contains affiliate links to products I use and recommend. I may receive a small commission if you purchase through one of my links, at no additional cost to you. Thank you for your support!
Why use WordPress to build your site?
Before we start building your portfolio site, let’s take a quick look at WordPress first.
If you’re not familiar, WordPress is the most popular Content Management System (or CMS) worldwide.
It’s simply a piece of software you can use to build and manage your websites more easily than building them from scratch.
According to W3Techs, WordPress powers 43% of all websites worldwide and has a CMS market share of 62.9%.
WordPress.org vs WordPress.com
When you start building a portfolio website on WordPress, you should know that it comes in two versions:
- WordPress.com is the free version hosted on wordpress.com.
- WordPress.org is the self-hosted version you can install and run on your web hosting account.
We will use the self-hosted .org version for your portfolio site. It’s free to use and it’s much more powerful than the .com version.
Thus, when I’m talking about WordPress in this post, I’m referring to the self-hosted .org version.
For more details about the two, check out this post about WordPress.com vs. WordPress.org.
How WordPress makes building a portfolio site easier
All in all, WordPress makes building any type of website easier and faster.
It makes SEO super easy (we’ll look at this in a minute) and it’s responsive and quick to learn.
Plus, you can choose from thousands of design templates and WordPress themes to customize your portfolio site. And the myriad of different plugins helps you add new features and functions to your website quickly.
I use WordPress for almost 100% of my website projects and I couldn’t be happier with it. It’s a real time-saver with amazing customization options, even if you’re new to web development.
In short: WordPress is a powerful platform you can use to create an entire website or blog in just a few hours. For more details, check out my post with the top practical reasons to use WordPress.
How to make an online portfolio website on WordPress
Now that you know what you can use a portfolio site for and why WordPress is the perfect tool to make one, let’s start building it!
Here are the eleven essential steps you need to follow to make an online web developer portfolio site on WordPress:
- Register a domain name
- Choose a reliable WordPress host
- Sign up for hosting
- Install WordPress
- Install a WordPress theme
- Choose and install essential WordPress plugins
- Build your homepage
- Add relevant projects and work samples
- Create an About Me page
- Build a contact form
- Add more content
Let’s get started!
1: Register a domain name
The first thing your website needs is a name that people use to visit your portfolio.
A domain name is whatever you type into your browser in the URL or web address field. Then, when you hit enter, the browser displays that website to you.
When you get a domain name, you’re simply registering it for a given time. Usually, the registration is valid for one year at a time.
When that year is up, you need to renew your registration to keep your website up and running.
How to choose a good domain name?
Needless to say, you want to avoid long, complicated domain names. Since people have to type it into their browser, you want to make it as easy as possible for them.
Here are a few characteristics to focus on with your portfolio domain name:
- Short and sweet
- Easy to remember
- Clear, concise, easy to spell
- Distinct from other domains, unique enough
All in all, you want to keep your domain name as simple as possible. If you can, you can incorporate your name or a relevant keyword into it, too.
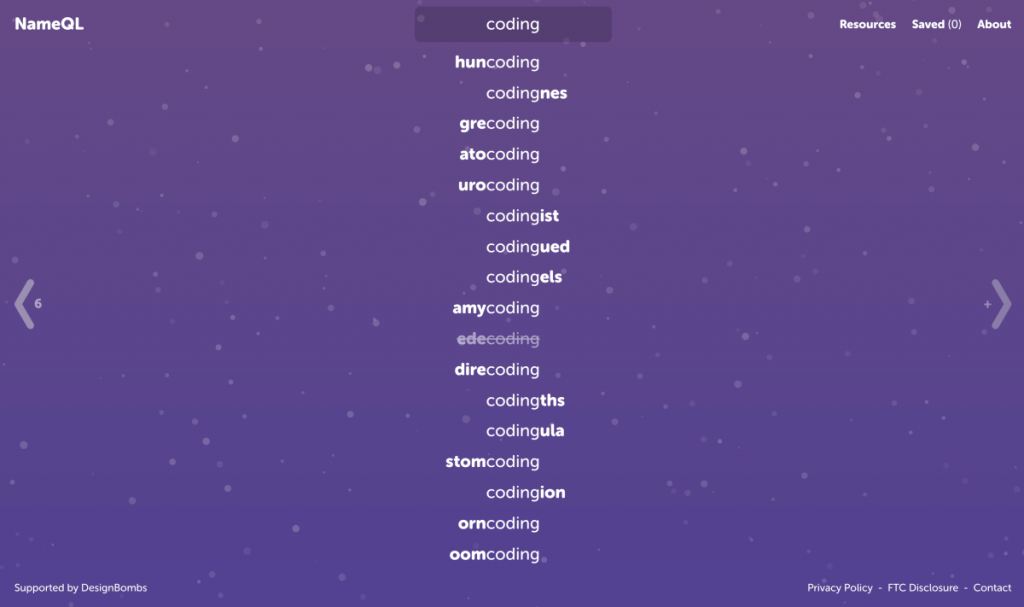
If you need to do some brainstorming, use NameQL.com to find good ideas.
Where to register your domain name?
Doing a quick Google search gives you dozens of providers you can use. Just do a bit of research and see which one you like the best.
Also, check a few reviews and make sure there are no hidden fees. On average, a domain name should cost you about $10–15 per year.
I usually register my domain names with Bluehost, which is also where I host most of my websites and blogs.
For me, it’s just practical to have everything under one roof.
Also, you’ll get a free domain name for 12 months if you decide to host your portfolio website with Bluehost.
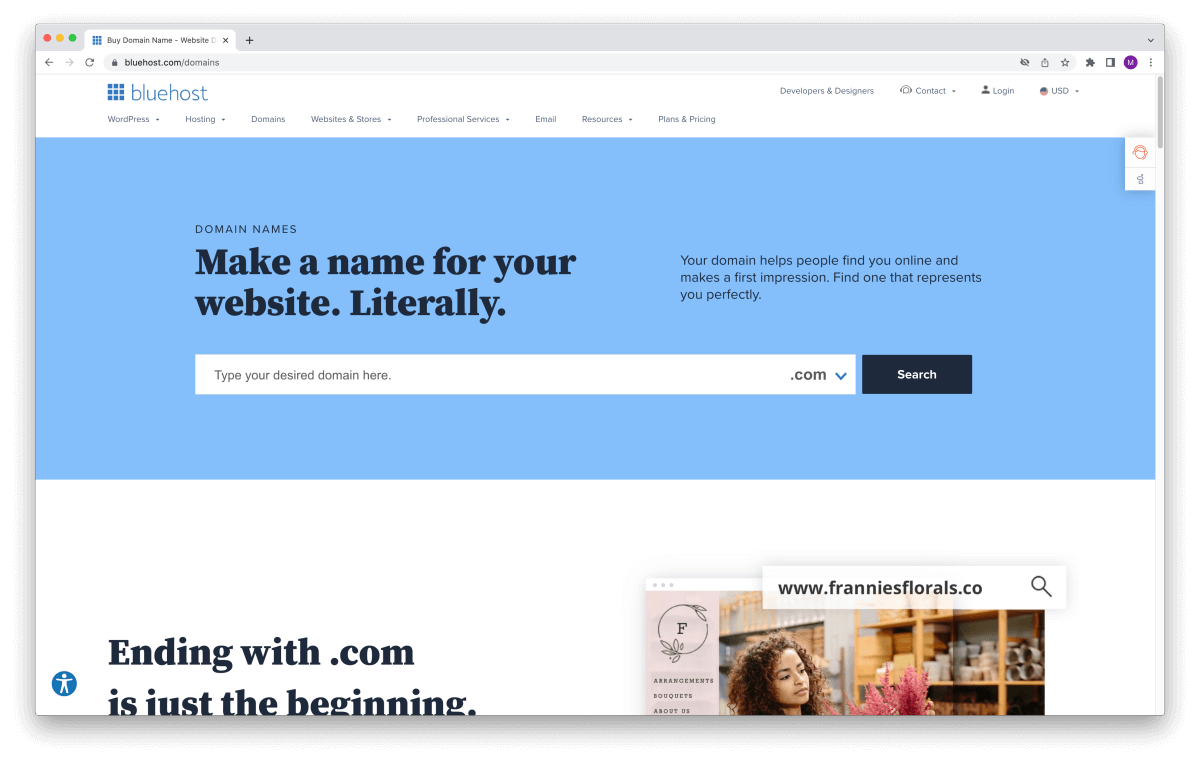
That said, check if your domain name is available with this nifty lookup tool:
When you find a domain that’s available, you can register it right away.
However, to save a few bucks, you may want to pair it with your web hosting to get it for free. Let’s have a look:
2: Choose a reliable WordPress host
To get your portfolio website online, you need to sign up for web hosting. Your WordPress hosting provider rents you the web server space you need for your website files.
Then, when someone wants to visit your site, your hosting provider delivers the necessary files to be displayed in their web browser.
If you are not quite familiar with the technical side of setting up a website, check out my free guide on how websites work. It introduces you to domain names, web servers, and more.
How to choose a hosting provider?
Before you choose your host for your portfolio site on WordPress, you want to do your research and compare a few providers.
Doing a quick Google search returns hundreds of hosting companies. You’re free to choose the one you feel matches your needs the best.
But which web hosting provider should you choose?
Here are five key criteria for choosing your WordPress host:
- Performance:
Your hosting provider should have a solid technical setup for reliable uptime and fast page loading speed. - Scalability:
Choose a host that can handle bigger sites in case you want to host further projects with them in the future. - Security:
Pick a hosting provider that takes web security seriously and offers legit tools to keep your website safe. - Ease of use:
Find a host that has an easy setup process and management tools for your WordPress hosting account. - Support:
This one is super important! Make sure they have a reliable support team available 24/7, just in case something goes wrong.
At the end of the day, it all boils down to finding a provider you feel comfortable working with.
If this is your first website launch, you want an intuitive setup and a beginner-friendly dashboard to manage your website.
Otherwise, you’ll spend hours just learning how their tools work while you could be doing stuff that really makes a difference to your portfolio.
Which WordPress hosting I recommend
There are heaps of different hosting companies you can choose from. Most of them are perfectly OK, but I’ve had a few bad experiences, too.
If you want to play it safe, I recommend signing up with Bluehost. They offer a few different WordPress hosting plans that are reliable and easy to set up.
And what’s even better:
WordPress.org itself recommends using Bluehost for building WordPress-based websites.
That said, here are a few points why I use their WordPress hosting:
- Easy to set up:
You can sign up for hosting with them in 10 minutes. - Free, automatic WordPress installation:
They set up WordPress on your account for you when you sign up. - Free domain name:
Register your domain for free for the first 12 months. - Fast 24/7 support:
I’ve waited an average of 1.5 seconds for their reps to join the live chat when I’ve had any questions. - Free SSL certificate:
Use the free encryption certificate to protect yourself and your visitors. - Free custom email addresses:
Create unlimited email addresses for your domain name. - No hidden costs or fees:
Clear pricing structure – what you see is what you pay. - 30-day money-back guarantee:
If it’s not your thing, you can cancel your plan anytime.
All in all, Bluehost has always offered great value for my money. They’re easy to work with and I’ve never had any problems with their hosting products or support.
Exclusive web hosting deal for my readers
I’m a proud independent partner with Bluehost, so I’ve gone the extra mile and negotiated a little hosting deal for my readers.
If you choose to use Bluehost like I do, you get access to a portfolio website hosting deal starting at just $2.95 per month.
However, you need to sign up for at least 12 months and pay upfront. It’s an investment, but spending $35.40 per year to launch a portfolio website will pay off, trust me.
Please note: I’m an affiliate partner with Bluehost. Thus, at no extra cost to you, I receive a small commission if you choose to host your WordPress portfolio with them like I do.
3: Sign up for web hosting
When you’ve found a domain name and a hosting provider you want to use, it’s time to set everything up.
If you have a hosting account already, feel free to skip to the next section.
If not, let me show you how to set up a hosting plan for your portfolio site on WordPress with Bluehost right away. This will only take a few minutes.
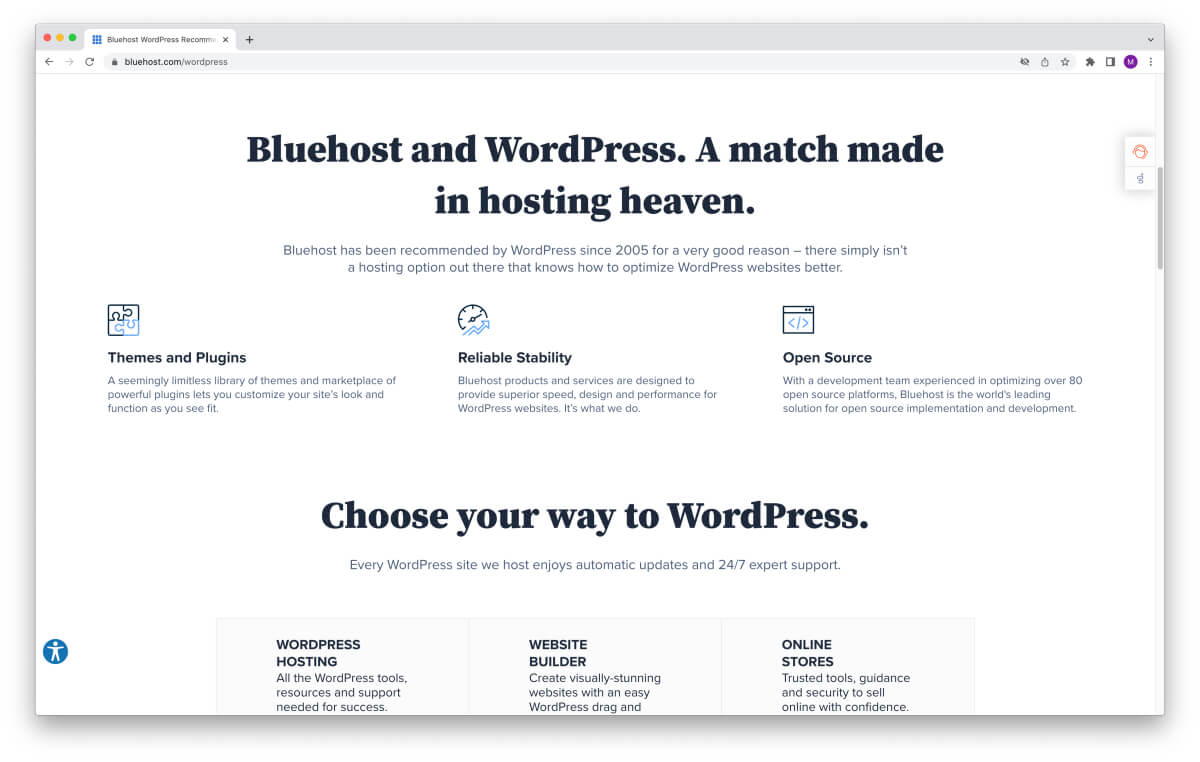
Step 1: Head over to Bluehost
If you haven’t already, click here to get to Bluehost to get started.
The page will look like this:
When you’re there, click on the blue button that says View Plans.
Step 2: Choose your hosting plan
You should now be looking at their WordPress hosting plan overview:
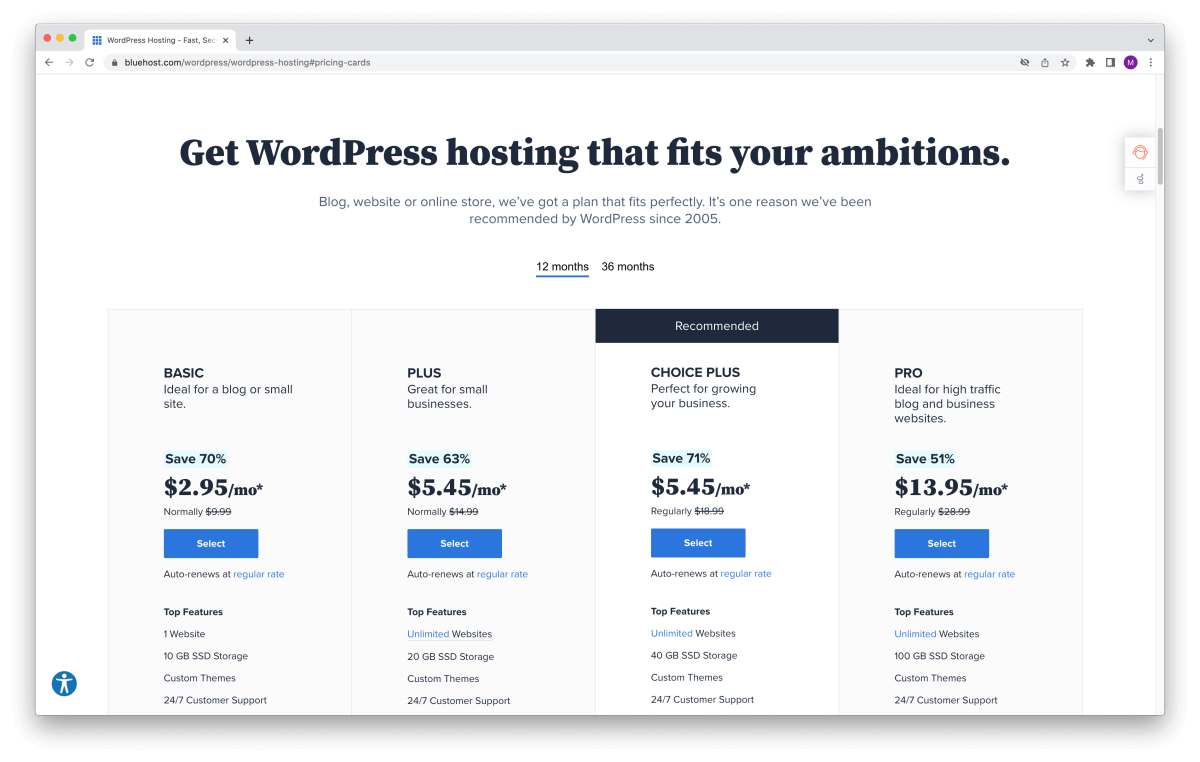
For now, it’s perfectly OK to choose the Basic plan. It’s more than enough to build your WordPress portfolio website. That is what I used for my first website, too.
You can always upgrade your plan anytime if you decide to build additional websites.
Now, pick your hosting plan by clicking on the according blue Select button.
Step 3: Select your domain name
On the next page, you can set up your domain name.
To create your free domain name, search for available names with the field on the left and click Next:
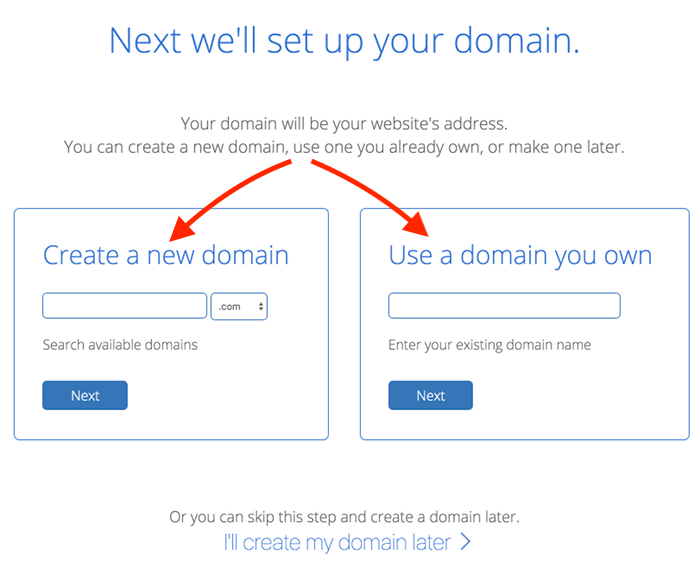
If you have registered a domain name already, enter it on the right-hand side and click Next.
If you haven’t found the perfect domain name yet, simply skip this step by clicking I’ll create my domain later at the bottom of the screen.
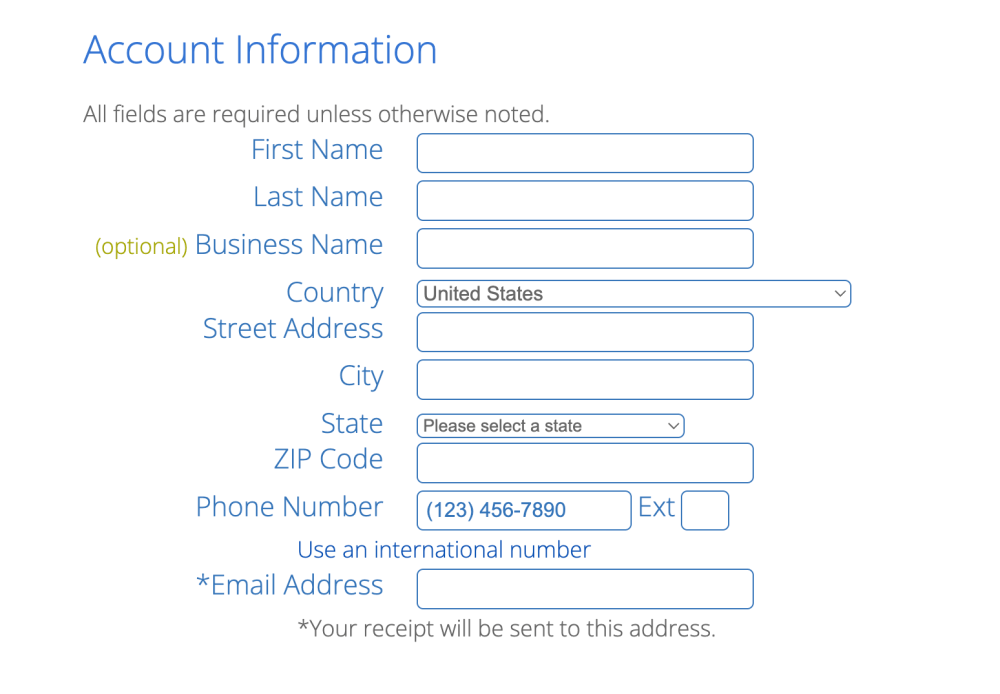
Step 4: Create your account
On the next page, you will finish your signup and fill in your account details:
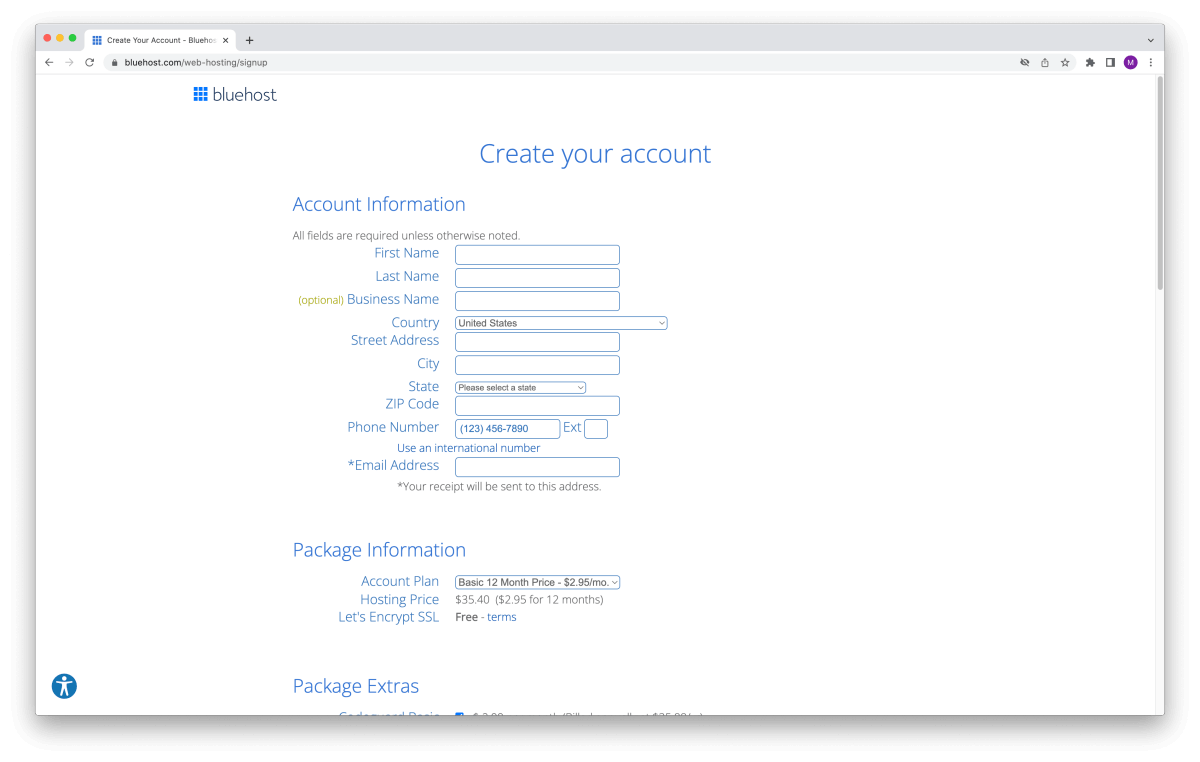
Start by filling in your account information (name, address, email address):
Next, choose the duration of your hosting plan:
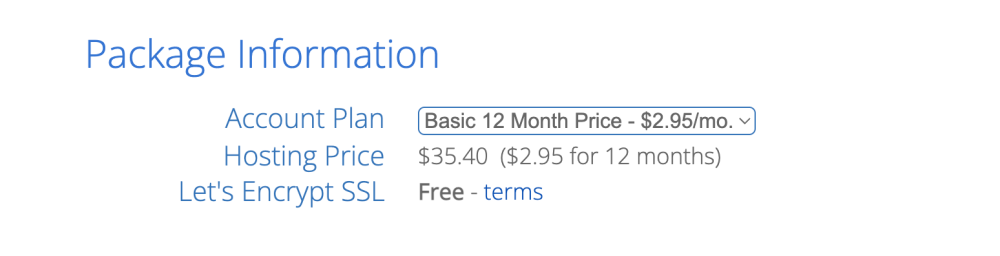
The minimum duration is 12 months and you have to pay upfront.
Next, you can to choose some package extras:
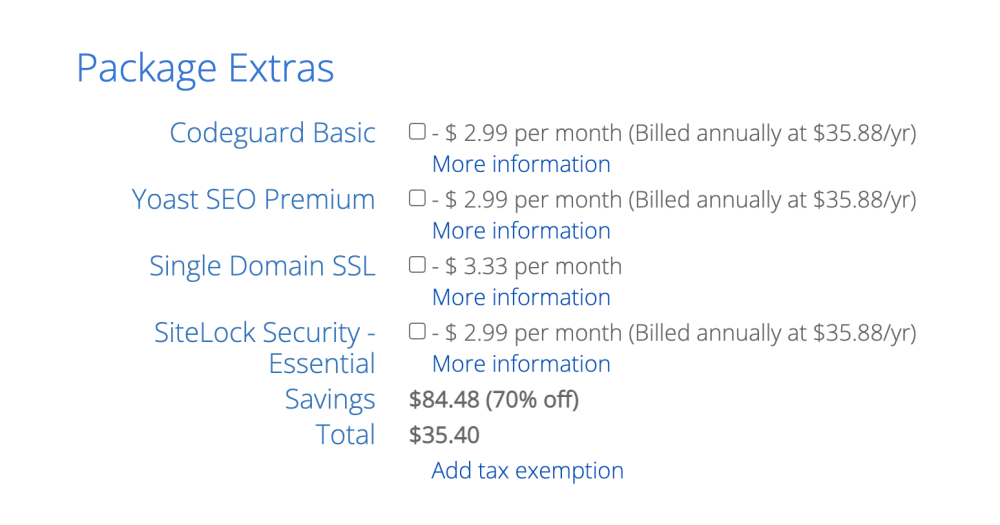
If you ask me, you don’t need any of these. Plus, they are quite expensive, costing more than your entire hosting plan per month.
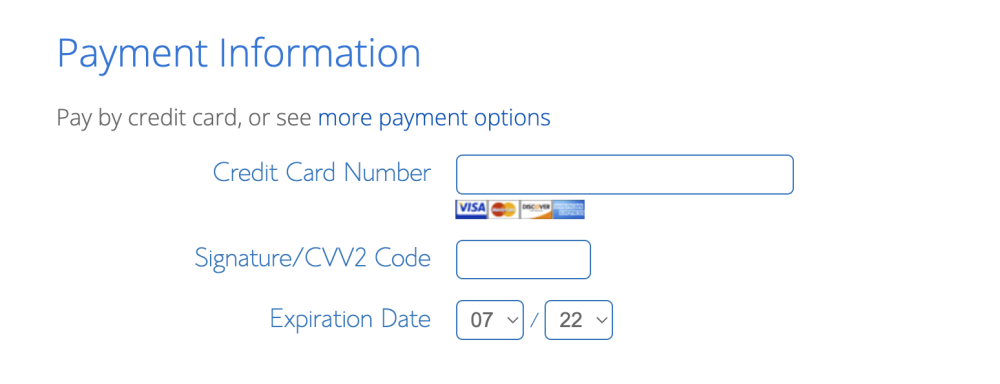
Finally, enter your payment information at the bottom of the screen:
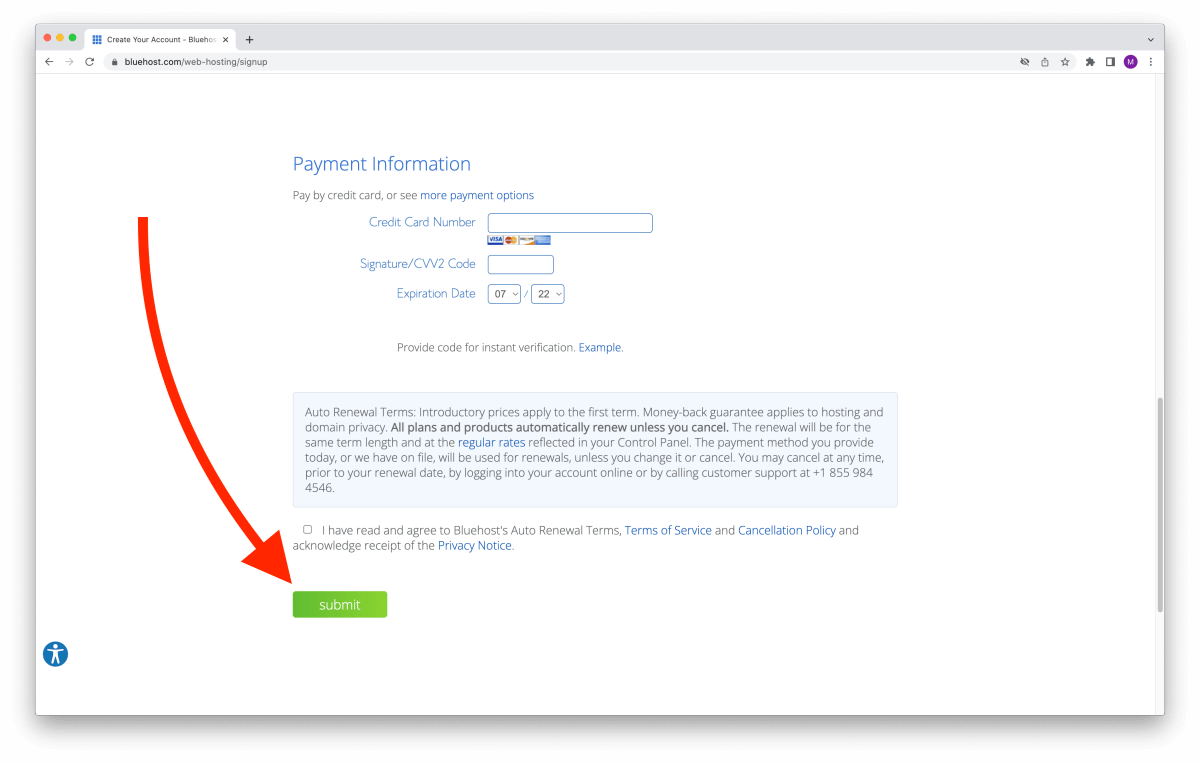
When you’re done, read the terms and cancellation policy carefully. Then, check the box at the bottom and click Submit to confirm your signup.
Step 5: Access your account with your credentials
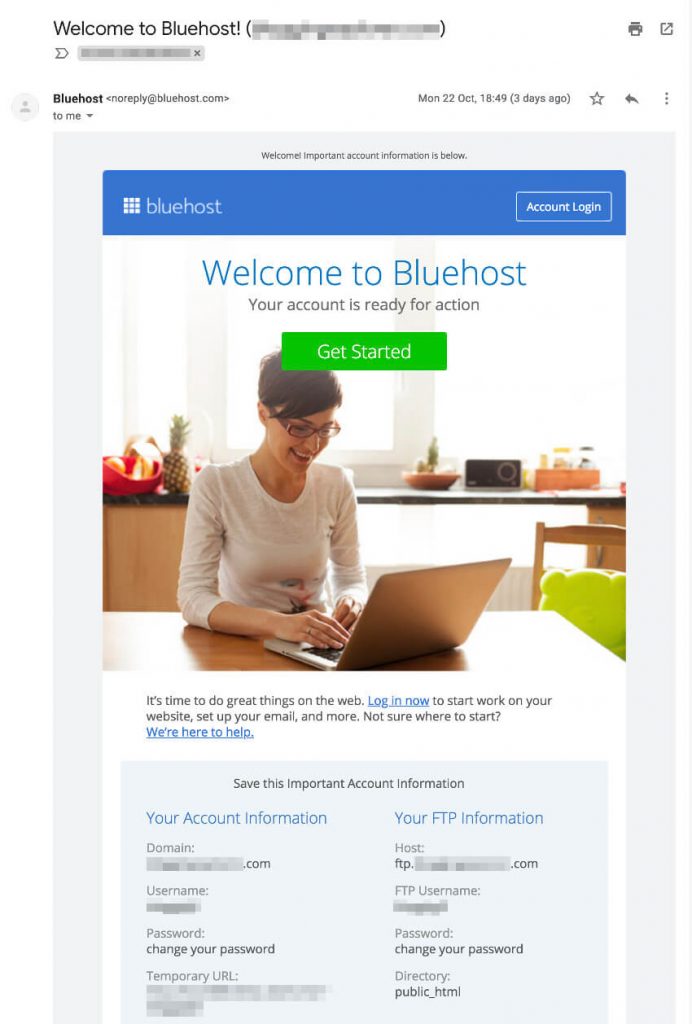
When you’re payment is confirmed, you are done with signing up, and you’ll see a friendly welcome screen:
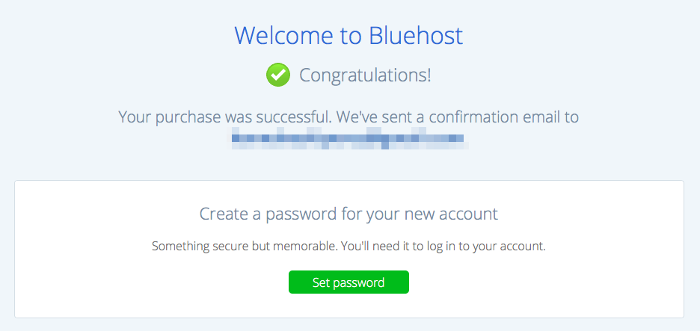
Also, you’ll receive a confirmation email in a few moments. It has all your login credentials and account details in it, so keep it safe!
Step 6: Set your password
To get started with your portfolio website, click the green button that says Set password (in the welcome screen above).
This will take you to the next page where you can set your password for your Bluehost hosting account:
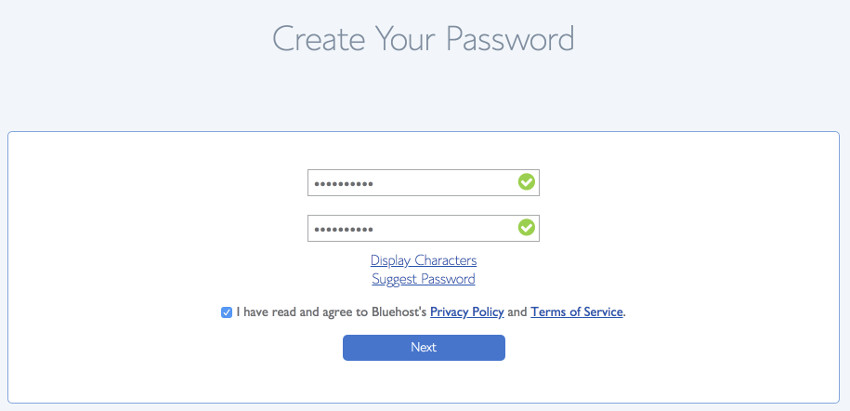
When you’ve selected and typed in your password, just click Next.
And that’s it – you are all set here!
Your Bluehost account is now set up. To login to your account, check your credentials in the email you just received:
4: Install WordPress
As we discussed earlier, WordPress is a Content Management System (CMS) that allows you to build and customize your portfolio website easily.
Thus, you can use it to quickly create, manage, and update pages, blog posts, and other types of content.
Depending on the WordPress host you’re using, this process might look a bit different. However, the basic steps are always the same.
First, let’s see how you can install WordPress on your Bluehost account.
Installing WordPress on Bluehost
This will be rather quick since Bluehost automatically installs WordPress for you. When you sign up for hosting with them, they do all the heavy lifting for you in the background.
Thus, when you’ve set your account password in the previous step, you can log in to WordPress right away.
Simply head over to your Bluehost admin area. Once logged in, you’ll see a dashboard like this:
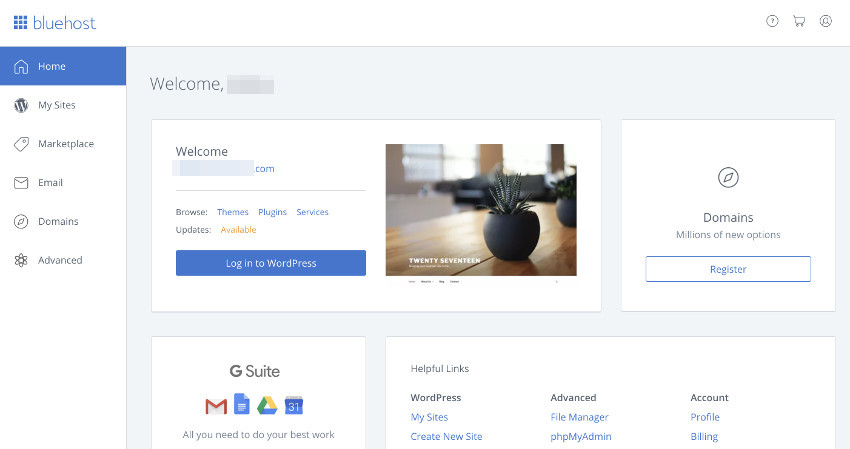
Here, click the blue button that says Log in to WordPress to access your website.
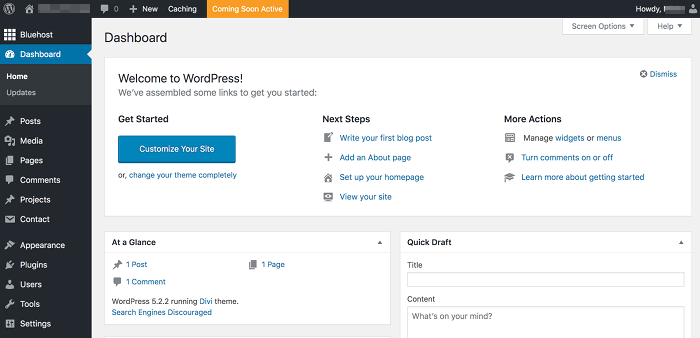
You’ll be taken to your WordPress dashboard (aka the admin area or the back-end) where you can start creating content for your portfolio website right away:
Installing WordPress on other hosting providers
When you sign up with another hosting provider, you gain access to a private cPanel or admin dashboard for your hosting plan.
All major hosting providers nowadays include a one-click WordPress installation.
Alternatively, you will find the Softaculous Apps Installer in your hosting account control panel:
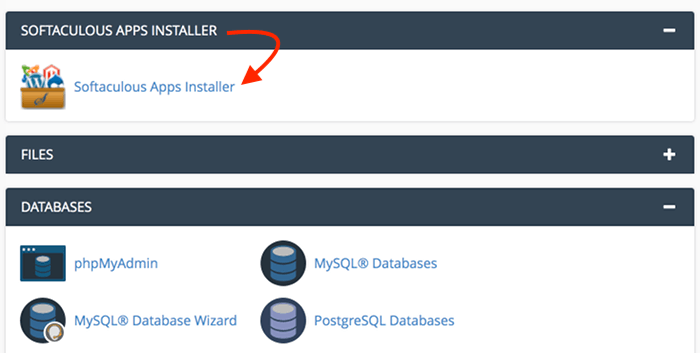
Click on the Softaculous Apps Installer icon to get started.
The next screen will show you more details about WordPress:
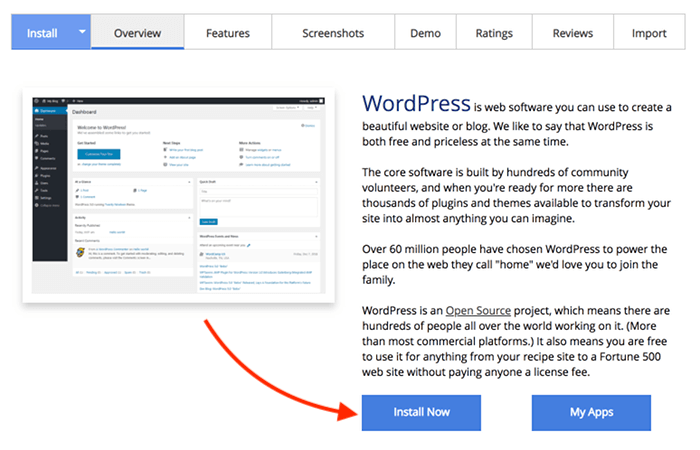
Simply click Install Now to start the installation.
On the next screen, you will be asked to fill in the details of your WordPress website:
- Installation URL
- Site name and description
- Admin username and password
- Admin email address
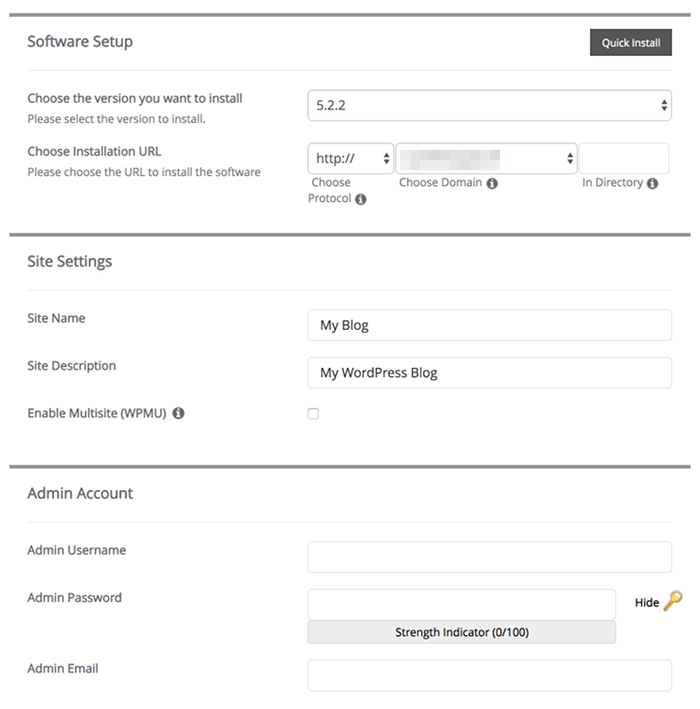
Make sure you choose the right domain name in the installation URL field. Also, change the default admin username to make your website more secure.
Once you click Install at the bottom of the screen, wait a few moments to allow the installation to finish.
When you’re done, your WordPress portfolio website is all set up! Congrats!
Related: How to Install WordPress Manually: Step-by-Step Guide
Now, we’ll look at how to turn your brand new WordPress site into a beautiful portfolio.
5: Find and install a WordPress theme
When it comes to choosing the right design template and theme for your portfolio site on WordPress, I can simply give you a few helpful tips and recommendations.
At the end of the day, you want to find a WordPress theme that allows you to design your site to fit your needs.
Here are a few practical tips for designing your portfolio site:
- Keep the design simple and clean
- Make your navigation clear and easy to use
- Include your contact details on every page (or in the footer)
- Use easily readable fonts
- Set the text color dark enough for readability
If you want to learn more about how to design user-friendly websites, check out this usability book – I use it for every project I build nowadays.
How to find a WordPress theme in your admin area
Back in your WordPress dashboard, let’s find a beautiful portfolio theme for you next.
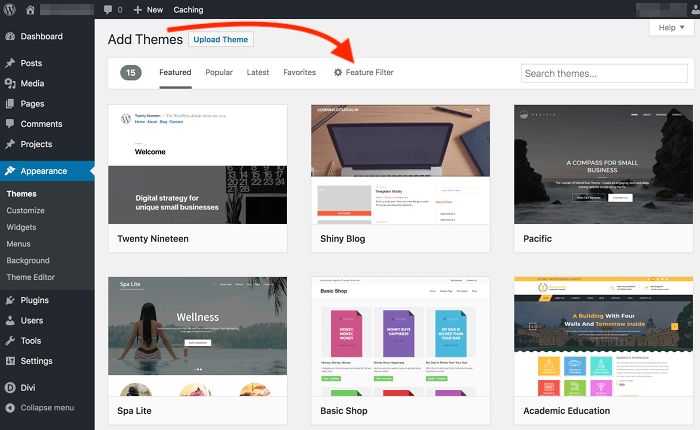
You can find hundreds of free WordPress themes by navigating to Appearance > Themes and clicking Add New at the top:
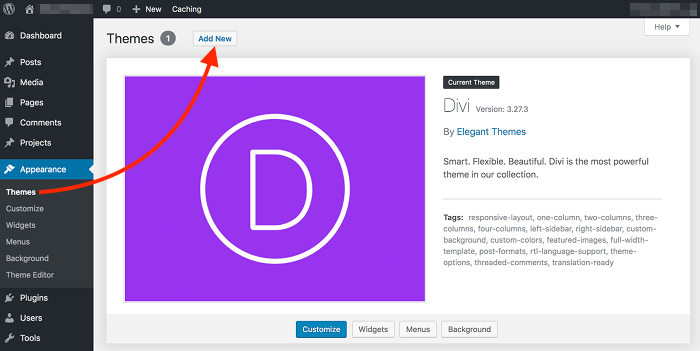
This website uses the Divi theme, which is why it’s visible here on the Themes page. I’ve been using Divi for a couple of years now – and I’ve never found a theme that’s easier or more fun to work with.
Also, Divi allows you to create your portfolio projects in WordPress just like blog posts or pages. You can either build everything from scratch or use a pre-made page layout to save time. You can then use the visual Divi Builder to quickly create a beautiful project layout to use.
Finally, you can present all of your projects in a responsive gallery that’s easy to customize the way you like.
And to get you started, Divi has a thorough documentation to help you learn how to make the most of its features.
Not sure if Divi is the right theme for you? Drop me a line in the comments below – I’m more than happy to help you find the perfect WordPress portfolio theme for you!
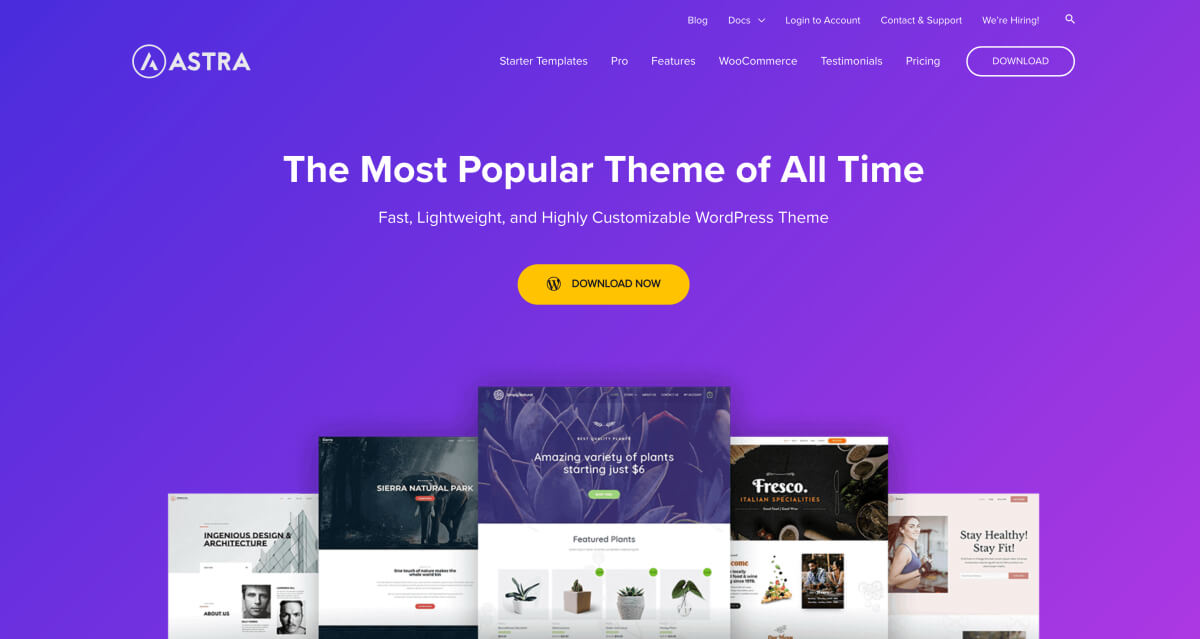
Here are a few more top WordPress portfolio themes:
- Astra (looks clean and intuitive out of the box)
- Hello (works seamlessly together with the Elementor page builder)
How to filter for the best portfolio WordPress themes
Alright, enough about Divi! You should now be in the Add Themes view where you can browse through hundreds of cool design templates.
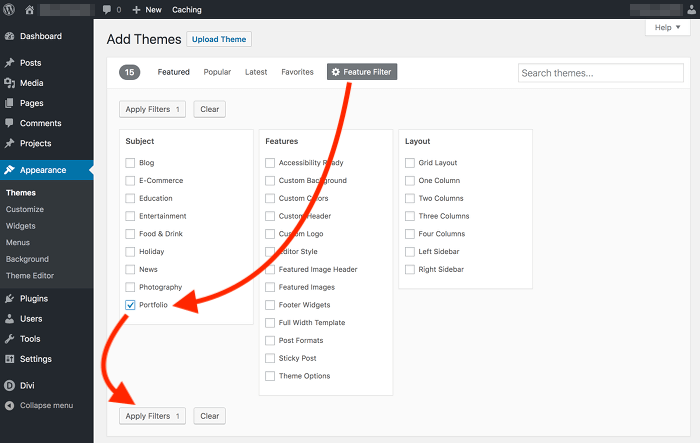
Use the Feature Filter to find WordPress themes specifically designed for portfolio websites:
Simply select Portfolio and click Apply Filters:
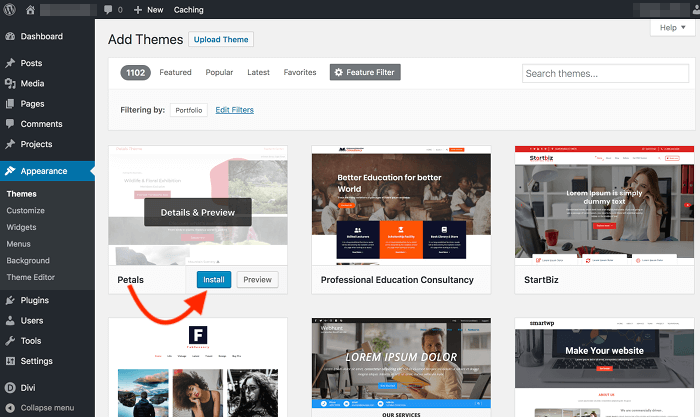
Now you can browse through different themes tailored to portfolio websites. Make sure your theme has good ratings and a good, beginner-friendly documentation.
How to install and activate a WordPress theme
When you find a theme you like in the listing, click Install:
When the installation is done, click Activate to apply the new theme to your portfolio site:
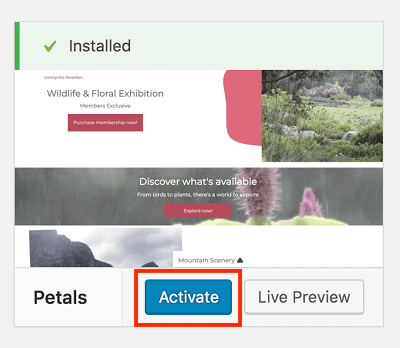
Ta-dah! Your new theme is now active and your portfolio website has a fresh look and design!
6: Choose and install essential WordPress plugins
WordPress plugins allow you to add new functions and features to your developer WordPress portfolio.
For example, you may want to add a contact form, SEO features to rank better in Google, or a backup plugin to make sure you don’t lose your data if something goes wrong.
However, the thing with WordPress plugins is that they’re third-party tools anyone can create and publish. Therefore, installing any plugin you like would be downright irresponsible.
To help you get started, here’s a helpful post for finding the right WordPress plugins for your website.
The ones I usually recommend are:
- All-in-One WP Migration:
Create single-file copies of your website for backups and migration. - Contact Form 7:
Create contact forms to help your visitors get in touch with you more easily. - Yoast SEO:
Optimize your content to achieve better rankings on Google. - Wordfence Security:
Protect your website against attacks and other security threats. - WP Fastest Cache:
Speed up your website for better user experience and search engine rankings.
When you’re ready, you can dive into the official WordPress plugin directory and see what you like.
Then, to install your plugins, head over to your WordPress dashboard again. There, navigate to Plugins > Add New to search and install the ones you need:
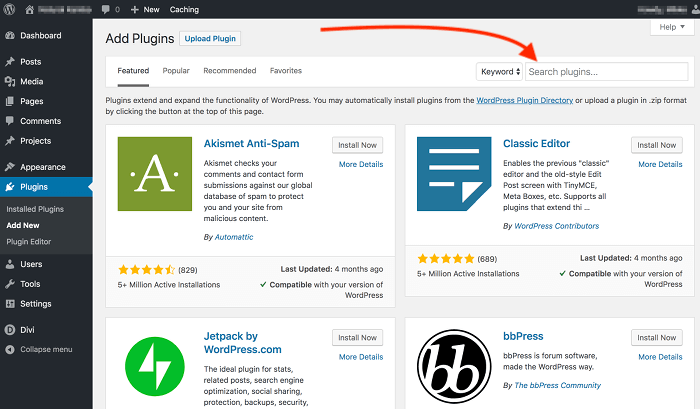
Finally, remember to activate each plugin after installation.
You’ll find an overview of all plugins you’ve installed and activated under Plugins in the menu on the left.
7: Build your homepage
So far, we’ve focused on the technical setup of your portfolio website. Once that’s all done, you can start with the fun part of creating your portfolio site on WordPress.
Now, it’s time to actually create your first pages for your visitors.
Depending on the WordPress theme you’re using, your pages will have a unique look. Some themes even come with built-in page templates you can use and customize as you like.
Here are a few tips to get you started with your homepage:
- Start by introducing yourself:
Let your visitors know who you are and what you do. A few short, snappy sentences are enough for now. - Present your skills or services:
List your core skills – or your services and how you can help people with your knowledge if you’re building a freelance portfolio. - Showcase your best work samples:
Thinking about your ideal employer or client, show them what you can build. Add a link to your Projects page, too. - Tell more about yourself:
Now is a good chance to give your visitors a few more details about who you are and how you work. Only write a couple of short sentences and link to your About page. - Give a call-to-action (CTA):
By now, a potential employer or a client will either leave the page or get in touch with you. Thus, this is a good spot for your contact details, a button to your contact page, or a contact form they can use right away.
Keep each section short and concise, and remember to proofread your text with this free tool, for example.
These days, people have very short attention spans. Therefore, make your page structure easy to skim with clear headings and short sentences.
8: Add relevant projects and work samples
Your project gallery is the most important part of your portfolio site on WordPress. It’s your #1 weapon to make sure potential employers and clients want to get in touch with you.
Think about your dream job or a freelance client. What would your potential employer or a client want to see?
Build your project gallery using relevant, recent work samples.
Choose about 8 to 15 of your best projects to make the gallery easy to skim through.
If you want to showcase more projects, you may want to split them into different categories. That way, your visitors can discover the most relevant projects faster.
Write a few short sentences about each project for more details:
- What was the main goal of the project?
- How did you solve a practical, real-life problem with your project?
- What tools and solutions did you use?
- What specific, measurable, and trackable results did the project yield?
Also, include a link to each project if possible. This will help your visitors get a better idea of whether your solution could work for them, too.
And finally, add a clear CTA at the bottom of each project. Encourage your visitor to get in touch with you, for instance.
If you work with graphics and design, include mockups of your final products for each project. For example, if you’re a graphic designer, you want to create your portfolio website using mockups and photos of print products you’ve designed in the past.
9: Create an About Me page
When you’ve chosen and uploaded your best projects, it’s time to introduce yourself in more detail.
Your About Me page is a great opportunity to let your visitors know who you are. In fact, this page is often one of the most-visited ones in portfolio websites.
Here are a few questions you might want to answer:
- What’s your full name and where are you from?
- What is your focus area in web development?
- Which types of projects and clients do you work with?
- What is the main benefit of working with you?
Also, feel free to write a few key points about your best skills. However, this isn’t necessary if you’re freelancing. After all, your potential freelance clients don’t want to read a resume.
Thus, if you’re looking for freelance work, write a few short sentences about what types of business problems you can solve for them.
For example, let’s say you build websites for small businesses like hair salons. You could create an online booking system for them, for instance. If fewer people call for appointments, they could spend less time on the phone. Thus, they could serve more clients and make more money.
That said, your solution would be valuable to them and they would be willing to pay for it. Makes sense, right?
Finally, don’t be afraid to add some personality to your About page. Keep it professional but be yourself. Also, make sure you add a clear, high-quality photo of yourself.
Great job! We’re pretty close to the end already!
10: Build a Contact page
Now that you’ve shared a few details about yourself, it’s time to let your visitors contact you easily. Your WordPress portfolio website should at least include your phone number and your email address.
However, I recommend you create a separate Contact page with a contact form for your visitors. Sure, you could just drop your email address on each page, but a contact form just looks more professional.
Here’s how you can create a contact form using the Contact Form 7 plugin:
Step 1: Install and activate the plugin in your WordPress dashboard
First, head over to your WordPress dashboard and navigate to Plugins > Add New.
There, enter “contact form 7” into the search field and click Install when you find the plugin:
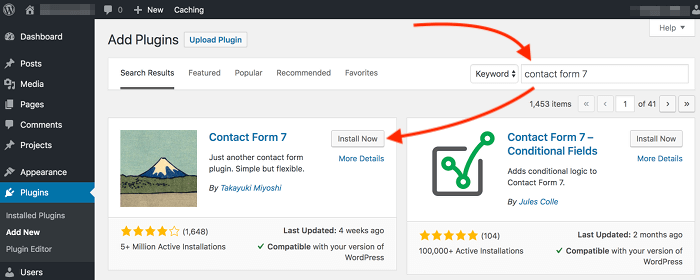
When the installation is through, don’t forget to activate the plugin.
Step 2: Create a contact form under Contact > Add New
The Contact Form 7 plugin adds a new navigation item Contact to the menu on the left.
Let’s head over to Contact > Add New to create your first contact form.
Here, simply enter a title for your form and edit your form template:
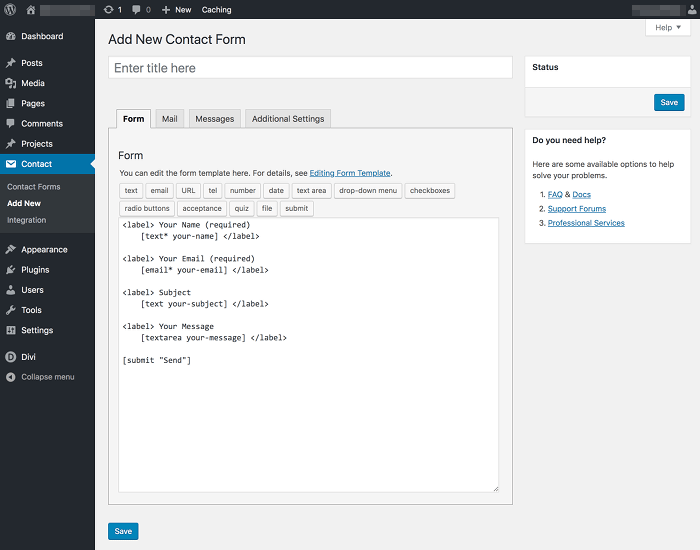
You can easily add and customize individual fields in your contact form. By default, you’ll have a field for name, email, subject, and message – and of course a Send button.
Next, on the Mail tab, you can edit the To, From, and Subject fields as well as the Message Body:
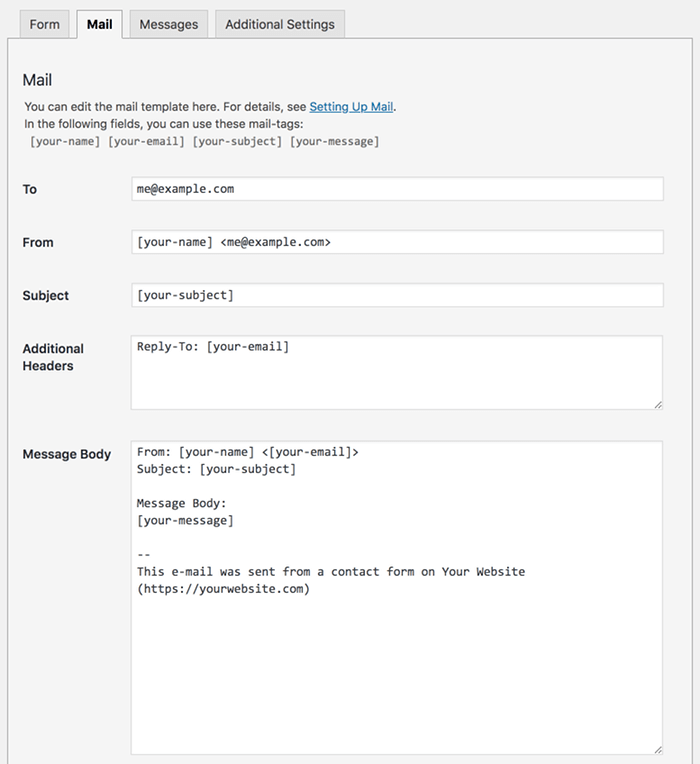
You’ll find detailed instructions in the official documentation for Contact Form 7.
Step 3: Embed the form on your Contact page
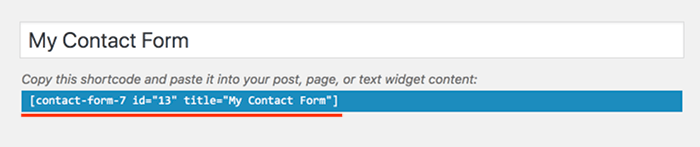
When you’re done with customizing the Form and Mail settings, click Save.
This will generate a shortcode for this contact form. You can copy and paste it into a text element on your Contact page to display the form to your visitors:
Now just go and see how the form looks and adjust the design and layout if you want to. Give it a title and perhaps change the color of the Send button, for example.
When you save the page and open it in your browser, you’ll see your form. Nice job!
11: Add more content
So far, you’ve built a simple but professional web developer portfolio website on WordPress!
Now, the next step is to figure out what type of content you want to create for your visitors.
First, make sure you get more familiar with your WordPress theme. Check out the official documentation and see what features you can use to make your portfolio site more interesting.
Play around with layouts, add new projects, and create more subpages that you feel your visitors would love to see. Here’s a great article at Skillcrush for some inspiration.
If you wish, you may even start your own blog about web development. Writing about what you do is a great way to keep track of your skills and projects. Also, it shows that you can describe the work you do in a way that allows others with less experience to understand it, too.
Now is a good time to take a minute to see how far you’ve come already. You have learned how to launch and build a website from scratch!
You know how domain names work, how to set up web hosting, and how to build a modern-looking WordPress website step-by-step.
With that said, if you want to start a career in web development, you’re definitely taking giant leaps towards your goals! Congrats!
Read next: 10 Essential Things to Include In Your Freelance Portfolio Website
Final thoughts: How to build a web developer portfolio site on WordPress
A great-looking web developer portfolio website can quickly become your #1 tool for finding new jobs. When potential clients and employers can easily get an idea of who you are and how you can help them with your skills, you’ll get hired faster than you might think.
Let’s sum everything all up for a quick overview:
Here are the eleven essential steps you can follow to build a portfolio site on WordPress:
- Register a domain name
- Choose a reliable WordPress host
- Sign up for hosting
- Install WordPress
- Install a WordPress theme
- Choose and install essential WordPress plugins
- Build your homepage
- Add relevant projects and work samples
- Create an About Me page
- Build a contact form
- Add more content
Now, check if your domain name is available and get your web hosting set up! Follow the steps above to create your first pages, upload a few relevant projects, and make it easy for your visitors to get in touch with you.
Let me know if you have any questions about how to build a portfolio site on WordPress. Drop me a line in the comments below – I’d love to hear your thoughts!
Sshare this post with others if you found it helpful!
Here are a couple of related articles you might want to read:
- 10 Actionable Tips for Right Now to Learn Coding Faster
- Web Developer Salary: How Much Does a Web Developer Make?
Happy coding!
– Mikke